Mohs Micrographic Surgery
Basics of Mohs Micrographic Surgery – How It Works
Mohs Surgery is a complex procedure combining surgical excision with immediate microscopic examination of the entire tissue specimen margin by frozen tissue processing techniques right in the office while you wait. In addition to your physician, who serves as the Mohs surgeon and pathologist, two to three histotechnologists are employed to process, cut, and stain the tissue specimen for proper histological study.
Mohs Information Quick Links
What is Mohs Surgery?
- Learn More About Mohs Surgery as a patient
- Learn More About the American College of Mohs Surgery
- Four Steps of Mohs Micrographic Surgery
- Step by Step Pictorial Presentation
- Tissue Illustration
- Advantages of Mohs Micrographic Surgery
- How To Prepare For Your Surgery
- What To Expect On The Day Of Surgery
- Wound Care Instructions After Mohs Micrographic Surgery
- Wound Care
- Prescription Medications
- Activity Level Following Surgery
Mohs surgery consists of four steps:

1. Numbing the skin with a local anesthetic called Lidocaine, marking the skin to create a map, and then surgical removal of a thin layer of skin containing the tumor in the shape of a pie.
2. Dividing the pie-like specimen into slices that are numbered, mapped, color-coded in the exact same orientation as the map on the patient’s skin and a paper map that will be used during the microscopic examination.
3. The tissue slices are frozen and sectioned into tissue paper thin slices that are placed on glass slides and stained in our Mohs lab contained by our own staff of four histotechnicians.
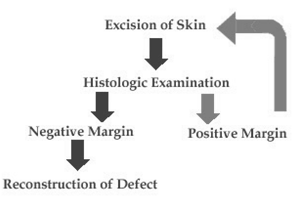
 4. Your surgeon examines each section under the microscope to determine if tumor tentacles are left behind in the skin. The tissue is oriented on the slide so that the border of the tissue or the pie crust is examined. This allows your physician to examine 100% of the margin just like he was looking at the entire pie crust of the pie. The filling of the pie or center of the tissue specimen is not examined because the tumor has already been diagnosed by the prior biopsy and the center of the specimen is not helpful for margin control. If the tumor is removed completely, the skin defect is ready to be repaired. If the specimen is positive for residual tumor, steps 1 through 4 are repeated until the skin is clear of tumor (see diagram).
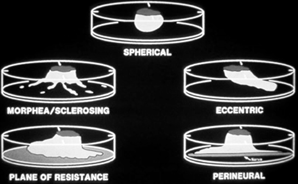
 This detailed examination of 100% of the margin by Mohs Micrographic Surgery differs from all other pathology techniques. If you have a skin cancer excised by a physician in the office or hospital, the tissue specimen will be sent to a pathology laboratory for processing and examination by a pathologist. The standard pathology techniques examine only 1% or less of the margin (pie crust). If this 1% is clear of tumor, the pathologist and surgeon assume that the other 99% of the margin is also clear. This approach might work well if skin cancers grew into the skin in a symmetrical manner like a sphere, however most complicated skin cancers grow in an unpredictable manner with tentacles growing in eccentric patterns that may wrap around nerves or track along cartilage planes. Therefore, even though a pathology report indicates clear margins, there may be tumor tentacles left behind on the 99% of the margin that was not examined. This incomplete examination of the margin is the most common cause for a tumor growing back and requiring another surgery. Mohs Micrographic Surgery does a better job of preventing recurrences because the entire margin is examined.
Please click on the following link to see how the tissue is processed differently and how this impacts the cure rate and size of the skin defect– Illustration of Mohs Surgery versus Standard Pathology and Excision Techniques.
The Mohs Surgery technique allows your physician to examine 100% of the surgical margin (or pie crust) and, if tumor is still present, pinpoint the exact location of the residual cancer.* This enables him to return to the treatment area and selectively remove another layer of skin from the positive area only. This minimizes the amount of normal skin that is removed and therefore creates the smallest possible defect in the skin. Guessing the location of residual tumor in the skin is completely eliminated with Mohs Surgery. Since many of the skin cancers removed with Mohs Surgery are complicated, multiple stages are often required to clear the tumor. Please be patient! Examination of each of your stages takes up to 60 minutes. If multiple stages are taken, the Mohs procedure can take up a good percentage of the day. Usually you have been warned if a prolonged procedure is anticipated. The vast majority of this time will be spent sitting in the waiting room watching television or reading a book or magazine.
In summary, the use of Mohs Surgery significantly increases the chance of complete cure and reduces the unnecessary sacrifice of surrounding normal skin. This minimizes the size of the hole, makes it easier to repair the defect, and will result in a smaller scar.
Advantages of Mohs Micrographic Surgery
+ Procedure performed from start to finish by a skin cancer expert
+ Highest cure rate available for skin cancer
+ Visualizes 100% of margin of excision vs. 1% with normal pathology
+ Smallest amount of normal skin is removed
+ Preserves cosmetics and function of the treated area
+ Smallest possible defect results in smallest possible scar
+ Surgery and microscopic examination by the same person
+ Reconstruction performed immediately after tumor removed
+ All done under local anesthesia in the office
How To Prepare For Your Surgery
1. Do not take any aspirin or aspirin-containing products for at least 3 weeks prior to your surgery (unless prescribed by your Internist or Cardiologist). Aspirin thins the blood. Also, do not take other anti-inflammatory pills, headache and cold remedies, or Alka-Seltzer. If your physician recommended that you take the aspirin, please check with him/her before stopping your medication. Please take Tylenol for a headache or pain. In addition, if you take high doses of Vitamin E, please stop it at least 14 days before the procedure. Coumadin, only if your Cardiologist approves, should be discontinued 3 days before surgery.
2. If you require antibiotic prophylaxis before dental procedures or other surgery, take your first dose of antibiotics 1 hour before coming to the office for your Mohs surgery. If you do not have a prescription at home, be sure to call us at least 3 days in advance of your surgery date so that a pharmacy can be called.
3. If your skin cancer is located in the center of your face, eyelid, or eyebrow area where a bandage will block your vision or impact your ability to wear glasses, please have someone available to drive you to and from the office. Because of limited space, you may have one family member wait with you on the day of surgery. This will help to ensure your comfort as well as that of the other patients having surgery on the same day.
4. Eat a normal breakfast or lunch on the day of surgery. If you wish to bring your own lunch or snacks, we have refrigerator space available for you.
5. Please wear comfortable clothing. Make sure that your shirt buttons in the front and does not slip over your head. No one-piece outfits.
6. Please take a shower and wash your hair on the morning of the day of surgery. Do not apply makeup (if the skin cancer is on your face), perfume, aftershave, or cologne.
7. Take all of your routine medications, as you normally would EXCEPT any of your medications that we have told you to stop.
8. If you are unable to keep the scheduled appointment for surgery, please contact our office at least 48 hours in advance to reschedule your surgery appointment.
What To Expect On The Day Of Surgery
After you arrive in the office, one of our nurses will greet you and take you to the treatment room where the Mohs procedure will be performed. They will take your blood pressure and ask about your medications and allergies.
Your surgeon will be in to greet you before the start of the procedure and answer any last-minute questions. Please let us know if there is anything we can do to make you feel more comfortable (i.e. change the chair position, etc.).
First, your surgeon will use a small needle to inject a local anesthetic (Lidocaine) to numb the skin. This feels like a bee sting and lasts only a few seconds. This is the only part of the procedure that is uncomfortable. The numbing medication lasts a few hours, however, if additional injections are needed later, these are usually painless or much less painful.
After the area is numb, your surgeon will remove a thin layer of skin affected by cancer. This is called Stage I and represents the first layer of skin that is mapped, divided, and color-coded. After Stage I is removed, an electric needle is used to stop any bleeding. The wound is bandaged with gauze and you will return to the waiting room or stay in the procedure room. While you are waiting, ask for coffee, read a book or magazine, or chat with other patients. Over the next hour or so, your surgeon and the histotechnicians are busy processing the tissue and examining the stained tissue sections with the microscope. Please be patient since this technique requires meticulous care.
If the microscopic examination reveals that there is still skin cancer behind, your surgeon will repeat the procedure as soon as possible. This second layer is called Stage II. Because Stage I was divided, numbered, and color-coded, your surgeon can determine exactly where residual skin cancer is left behind. Stage II will consist of a layer of skin that corresponds to the map created from Stage I. Therefore, additional tissue is removed only from those areas still affected by skin cancer. The average number of removals required is two to three stages. Fortunately, the Mohs procedure can be completed typically in less than a half-day and is on an outpatient basis.
Once your surgeon is confident that the skin cancer has been completely removed, he will discuss the options to repair the wound. Most often the wound can be closed in a linear fashion with stitches. This turns the circular hole in the skin into a fine straight line (scar). In other cases, a more complex procedure known as a flap or graft may be required to provide the best possible cosmetic result. This decision will depend on the wound size, depth, and location. If the wound is stitched up, the stitches are removed typically one week later, though this may vary from patient to patient.
Wound Care Instructions After Mohs Micrographic Surgery
This section is designed to help you care for your surgical wound following Mohs Surgery and any reconstruction of your skin defect.
Supplies that need to be purchased prior to surgery:
- Polysporin antibiotic ointment
- Telfa dressing
- Paper tape
All of these items are over-the-counter and are available in drug stores and pharmacies.
WOUND CARE
Keep the post-operative bandage in place until showering the next morning. Before showering, remove the bandage and discard it in the trash. Cleanse your incision with soap water (not hydrogen peroxide) to remove any drainage and crusting. Pat the wound dry and apply a generous layer of Polysporin ointment to the incision. Cover the Polysporin with a Telfa dressing cut into the shape of the wound. Tape the Telfa dressing in place with paper tape. Continue this wound care once daily until you return for suture removal.
PRESCRIPTION MEDICATIONS
Continue your regular medications as you normally would. Restart your Apixaban (Eliquis), Dabigatran (Pradaxa), Enoxaparin (Lovenox), Heparin (Innohep), Rivaroxaban (Xarelto), Warfarin (Coumadin), Clopidogrel, (Plavix), Ticagrilor (Brilinta), and Aspirin (these were stopped before surgery) on the day after surgery.
In the first 24 hours after surgery, take TYLENOL, not aspirin, for pain.
ACTIVITY LEVEL FOLLOWING SURGERY
Spend the first-day post-surgery relaxing. Keep your head elevated during the first few evenings with a couple of pillows. If surgery was performed around the eyes, apply ice packs during the first 48 hours to minimize swelling. Forehead, cheek, or eyelid repairs may result in a black eye(s) Heavy lifting and exercise are not allowed until after the sutures are removed. Showering can be started the morning after surgery. Bathing is allowed if the incision site is not soaked for more than one minute at a time. Pat the wound dry after leaving the shower and reapply the polysporin and bandage. Swimming is not allowed until after the sutures are removed.
Mohs Surgeons in California
Disclaimer
Treatment results will vary, talk to a practitioner to see if this treatment or procedure is right for you.
Conditions treated by Mohs Micrographic Surgery


 / 291 Reviews